Guide to Photographing Your Home For Sale & Listings
 An absolute must have for selling just about anything from homes to products is great photography. Portraying your home in a positive light the likeliness attract buyers is much greater than dingy, poorly lit camera phone pictures. We understand not everyone can afford a professional photographer to come shoot his or her home for listings, especially when you’re selling to avoid foreclosure, so we created this easy to follow guide. If you follow these simple tips you’ll out shine your competition and have a line out the door for showings.
- Any good home photographer will tell you lighting is crucial, it makes rooms look bigger, cleaner, and more attractive to buyers.
- For the best natural light take pictures at twilight for the perfect balance.
- When shooting then inside of your home turn on all the lights in the house so you spend less time brightening in post production.
- Light up any dark corners, if you need to bring in extra lights for a room to be well lit, do it!
- Open blinds to let in natural light, this will be the best type of light to shoot with
- Turn off your flash, you can make any room look awful with a bright camera flash
- Never photograph when the house is backlit by the sun it will ruin the pictures
- As we discussed in our staging guide it can make or break a sale, so photographing the home fully staged is a great start to making the sale.
- Use props to create a model home feel
- Remove trashcans from the side, cars from the driveway and any other objects that make the house look lived in.
- Remove clutter from everywhere in the house and remove excess furniture.
- Read over our staging guide for more great tips.
- When you’re ready to start photographing make sure you have a great camera. It doesn’t need to be paparazzi grade but it does need to be decent. If you don’t already have one try asking friends, family, or neighbors.
- Always use a tripod for stabilization and don’t tilt the camera. When you shoot dead on and level you will get the best results
- Don’t put corners in the center of the frame, I makes the shot feel closed in.
- Don’t shoot vertically, it will cause the objects in the picture to be distorted
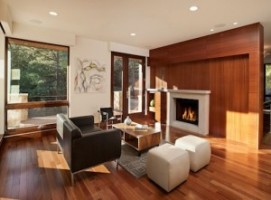
- When shooting a space only include two walls with a little bit of ceiling and some floor
- Put furniture , props, or decorations in the foreground of the photograph to create depth.
- If your home is on the empty side take shots of connected rooms together, it will make the home seem more open.
- When you are taking shots of the outside of the home getting to higher ground from a slight angle will be best. Using a stool or ladder will work best, but the top of the car will do in a bind.
- So you’ve taken a hundred shots of your well-lit and beautifully staged house, what’s next? It’s time to put them on the computer and do some post shoot tweaking. Any basic computer should have some sort of photo editing software, so don’t go buying Photoshop, preferably something that can brighten, contrast, and re-size.
- First item on the list is to add brightness and contrast to the photos. Don’t put a miniature sun inside your living room but generally speaking the brighter the better with above average contrast.
- Many cameras now days have extremely high resolutions so re-sizing these photos for the Internet will make your life 10 times easier. Realtor.com gives the following image guidelines 310 pixels wide by 233 pixels and no bigger than 1 mb.
- Save the photos to a common format, the most commonly used is .jpg
If you have followed all these steps you are both now a pro photographer and you have some awesome photos. Time to get to work uploading to your online listings, putting them on to flyers, or emailing to potential buyers.